
Monday, May 17, 2010
Naughty dog...


Monday, May 10, 2010
May already!
Time is flying by! I have about a month left of teaching before the summer break. I'm gonna miss these kids a ton...they are wonderful!
I was busy working in the yard this past weekend but was able to finish up some projects and slip a new one in. I am still having so much fun learning to felt. Here are a few things I was working on:


I was busy working in the yard this past weekend but was able to finish up some projects and slip a new one in. I am still having so much fun learning to felt. Here are a few things I was working on:


Saturday, May 1, 2010
Panel of spring flowers
 Laying out the fibers.
 .JPG)
So proud
My oldest daughter (17yo) is a very artistic gal! She has an eye for scale. She wanted to try needle felting after I checked out a book called Little Felted Animals, from the library. I pointed to my wool stash, gave her some needles, and a foam block and told her to have fun. She made me this adorable frog. I love being able to share a hobby with her!


Sunday, April 18, 2010
Break is at an end....
I bought some fabric, I felted panels, and I found some wonderful mother of pearl buttons while antique shopping this past week. I wish I had another week! But alas....back to work for me tomorrow. I will look forward to next weekend to put together my next project. Now I am off to plan lessons for my 5th graders!


Wednesday, April 14, 2010
More fun...
I have been enjoying my spring break. I have had the freedom to create whenever the mood strikes me. This process of learning how to felt has taught me small lessons along the way. I have enjoyed the process! Here is another bag. This one I wet felted the handles onto the body of the felt. I also tried building up higher layers to create ridged areas on the body of the bag and let the top edges take whatever shape they wanted.. I love the result!

This next project was creating a hollow ball. I used saran wrap as a resist on the inside. Hot pink on the outside and purple on the inside.

Tuesday, April 13, 2010
Peaches and Cream

Here is the other super light and soft scarf I made. A few weeks ago I dyed Merino wool and Tussah silk. This is some of the wool and silk from that day. I made this scarf wider and fringed the ends with undyed Tussah silk. I love the wavy texture that resulted! I woke up this morning energized to create more, so I have dyed up some more wool and have it drying in the sun-soaking up the wonderful Florida sun! I love Spring!


Florida Caverns
We had a wonderful day at Florida Caverns. The caves were wonderful and outside the trees were lush with new growth. As we looked around, wildflowers were in bloom EVERYWHERE! It was a great day with nature and the family!


Saturday, April 10, 2010
super thin and soft summer scarf

Thursday, April 8, 2010
Felt Roll
I made a tiny felt roll today. I wanted to try it, just to see if it would turn out. It did, although I do need to find a better way to cut it. It would also help if I showed a little patience and actually let it dry completely before trying to cut it!! :) Patience is NOT something I am known for... ;)


Wednesday, April 7, 2010
Another bag

Friday, April 2, 2010
Vase
Felt a bit stressed this week and wanted to make something to help ease my nerves. I took some wool that was bright and cheerful and spun it thin and then did some thicker strands. I then put them both together and this is what I ended up with. The vase itself was wet felted onto a resist. This was my first time using a solid resist. It did take some patience and has a couple thinner areas...but all in all it was a good learning experience!

Saturday, March 27, 2010
Spinning....
I wanted to try using a drop spindle to spin wool. I actually ended up with something that looks not too bad! I am amazed!! :) It does take some practice , but is actually pretty fun once you get into a rhythm. Here is a picture of some that I worked on this morning.


Thursday, March 25, 2010
Coiled bowl
My oldest daughter wanted me to dye a rainbow for her. Once the wool dried I made her this coiled bowl. It reminds me of the ones we made when I was a kid in elementary school with clay! I felted thin ropes and then sewed them together.


Tuesday, March 23, 2010
Simple Fun

Sometimes simple is fun! The girls and I have made tons of baseball and softball sized balls. I have enjoyed needle felting them when they are dry. The girls just like to peg each other with them! :) Ah.....life with teenagers!
Sunday, March 21, 2010
Making panels with my dyed wool
Yesterday I experimented with hand dyeing wool. Today I wanted to make wool panels from that wool to check the color AFTER wet felting. I am happy to say that I had no color loss after wet felting! The following panel is one that I am going to embroider, mat, and frame. I added some silk fibers and a bunch of the green wool that I purchased earlier. The base and flowers are from the merino that I dyed yesterday. I am happy so far.... I LOVE SPRING!


Saturday, March 20, 2010


My results so far..
Okay so I switched the dye source. I was going to do koolaide but was not happy with the color choices. So I did some more research and found information on using Wilton icing dyes.


 Drying
Now off to dye the silk...... :)
Update: The silk took the dye and left me with rich deep colors! It does have a tie dyed effect in some areas, but I really, really like the outcome.


Soaked wool in cool water and vinegar before dyeing


Water and Dye (use a tablespoon of dye)


Wrap in plastic wrap and nuke for 2 minutes
 Drying
Now off to dye the silk...... :)
Update: The silk took the dye and left me with rich deep colors! It does have a tie dyed effect in some areas, but I really, really like the outcome.
Friday, March 19, 2010
Glorious Friday
This post has nothing to do with felting....it's just a post about being thankful that my students and I made it through 2 weeks of state testing!! I am extremely proud of those kids and how hard they have worked...now we can get back to the business of exploring and learning! :) aaahhhhhhh......... :)

If this drawing wasn't so true it might be funny!

If this drawing wasn't so true it might be funny!
Thursday, March 18, 2010
I'm dyeing this weekend :)
I've ordered tons of undyed wool and even some tussah silk top. Every day I come home, I have a new package! My daughter and I are going to be dying wool and whatever else we can find this weekend. I'm not brave enough to use the professional types of dye, so we will be using koolaide. I figured this would be a fun way to experiment and if I find it's not for me, then I have not invested too much! If you have any tips for me, please share!
Monday, March 15, 2010
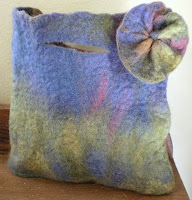
My First Handbag
I used a plastic grocery bag as a resist for this project. I had left over wool from my scarf project so I made a bag to match. I hand sewed the flower from a scrap piece of felt I made at the same time. This reminds me of a watercolor everytime I look at it.


Sunday, March 14, 2010
It worked!
I am so excited! My scarf turned out! It was a really fun project and now my oldest daughter wants one! I took pictures along the way....so here we go....
Step 1-Laying out the fabric

Step 2- Choosing the wool

Step 3- Wetting the wool and fabric

Step 4- Rolling it all up

Step 5- Rolling, rolling, rolling, rolling at least 20 good minutes
Step 6- Rinsing

Step 7- Waiting for it to dry! A new scarf! :)

Step 1-Laying out the fabric

Step 2- Choosing the wool

Step 3- Wetting the wool and fabric

Step 4- Rolling it all up

Step 5- Rolling, rolling, rolling, rolling at least 20 good minutes
Step 6- Rinsing

Step 7- Waiting for it to dry! A new scarf! :)

Subscribe to:
Posts (Atom)